Happy Thursday! It has been a busy week with customer orders and getting ready for my class Saturday morning at Beth’s Heirloom Sewing! It’s going to be a small class of 15 which I am excited about and I HOPE I do a good job! The class filled up quickly so I’ll be doing another NEXT Saturday as well.
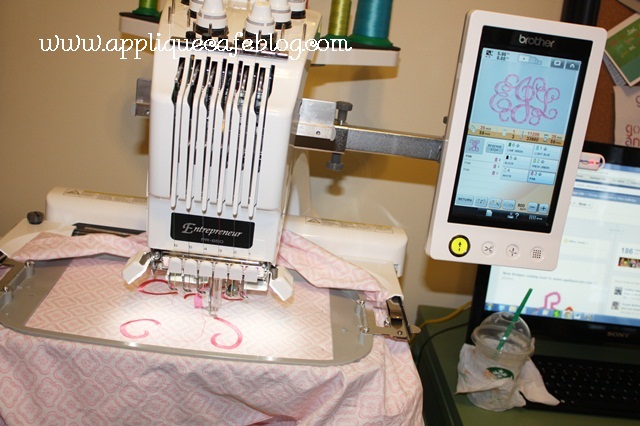
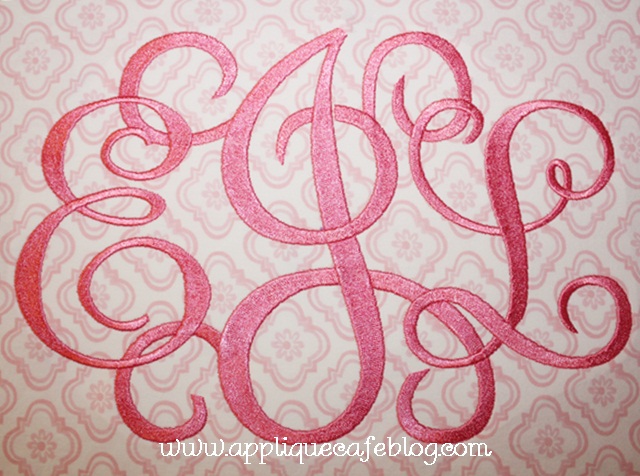
Here are a few things I’ve been up to this week. First, a friend brought me a couple of cute Pottery Barn Kids pillowcases to monogram for her daughter’s room. She had “pinned” a font she liked on Pinterest so I was able to do something similar with Monogram Wizard Plus’ PENDANT font + Sydney “E”. I didn’t like the wings on the Pendant E (it was too much) so I merged in the Sydney E. I did the 3 letter monogram in layers in my MWP software. Layer 1 – I, Layer 2 – E, Layer 3 – L. After the fact, someone pointed out that if you use lower case letters in Pendant, they don’t have all the wings. Next time! I just got the font so this was my first time using it. This monogram was big ~ 5.96″ tall X 8.88″ wide, so it was 33,980 stitches and machine time said 59 minutes. I did fill stitch since the monogram was so big and on a pillowcase. It really didn’t seem like it took that long and it turned out very pretty!!
I used 2 layers of medium cutaway and my biggest 8×11 hoop.
Here are a few shirts I did for a relative of a friends soon to be sister in law. Got that?. This is our Girl Bunny design with Michael Miller Candy Ta Dot and Riley Blake My Mind’s Eye Quite Contrary in green. The font is Monogram Wizard Plus Specs.
This is our Mermaid design with the name in MWP Curly Q. I think the dot fabric is Riley Blake?
Lastly, our Zig Zag Popsicles which I LOVE! I used MWP Kim Single font.
I love all of these colors together for SUMMER!
OK…. I have seen a post or two on Facebook about maintenance with 6 needle machines. Let me start by saying I am not a Brother expert or a certified service person, nor do I play one on TV. I thought I would pass along a few things that I learned when I bought my machine from Steve at Sewingmachine.com. They ARE a certified service center for Brother so I feel like his tips are noteworthy. I’m sure all dealers are different! You can find lots of great videos on their website under VIDEOS!
First of all, when I got the machine Steve showed me how to oil the needle shaft. I put a drop of oil from my oil pen on the needle shafts (all 6 of them) once every couple of weeks (when I realize I haven’t done it in a while!!). You just pull the needle down, put a drop of oil and then pull the needle up and down another time or two so that the oil disperses on the shaft. You have to go through and select the different needles. For instance, if needle 1 is selected, then it will pull down and also needle 2 will pull down, but needles 3-6 will be locked. So, you have to then switch to needle 3 and oil 3 and 4. Then switch to 5 and do 5 and 6. I saw a picture on Facebook this week of someone who had removed the whole front panel of the machine to expose all the needle “workings”. Not sure if she was doing that to oil the shafts but I learned to just oil them the way I just explained.
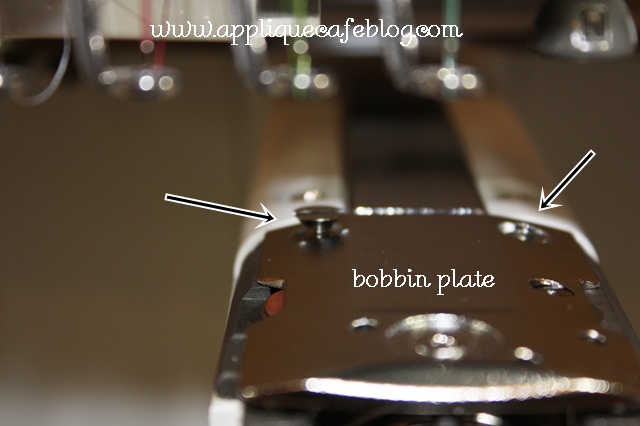
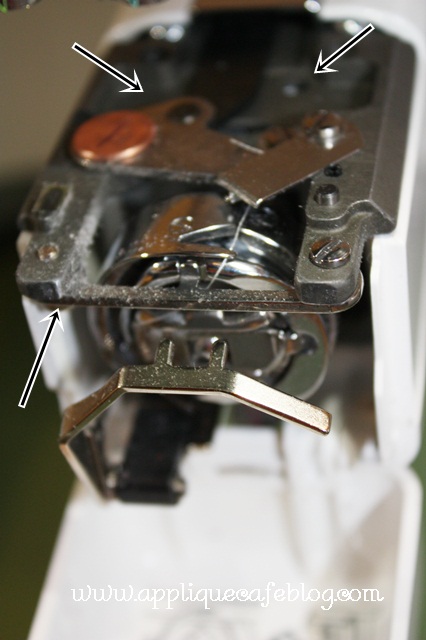
Every now & then you should really remove the throat (bobbin) plate and give it a good cleaning. Just unscrew the 2 screws with the tool that was included in your tool kit. When you take the plate off you might see all kind of lint and tiny thread pieces. I do this usually when I change out all my needles and “clean” my machine. Again, I change my needles every few weeks or so usually when I realize I have not changed them in a while, and also if I’ve done a lot of embroidery with sticky paper I change them out. I use Schmetz Embroidery Needles ~ 75/11.
Mine has a little bit of lint and dust, but is pretty clean because I cleaned everything a week or two ago. It was FULL of tiny pieces of thread!
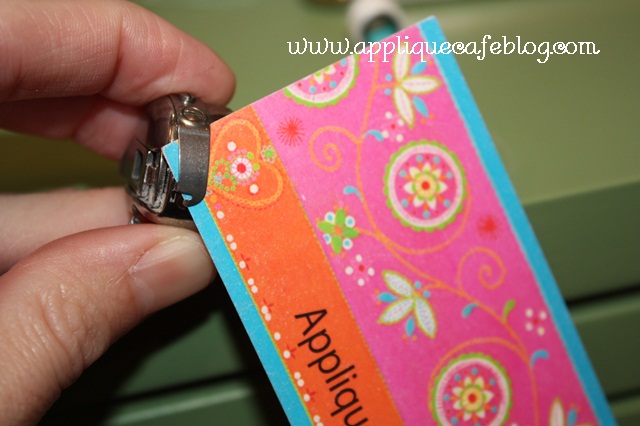
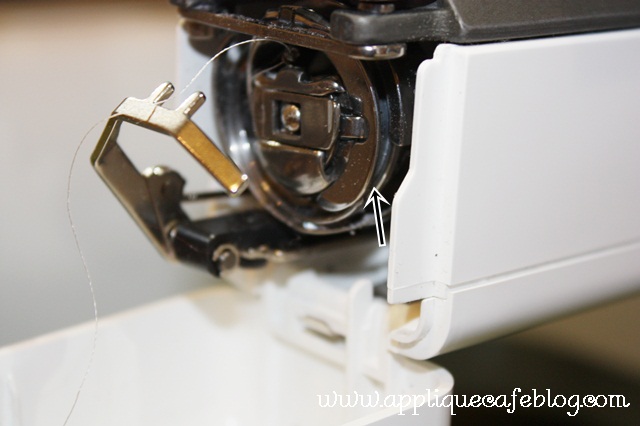
Your bobbin case can get dusty and gunky too. Fuzz can get caught under the clip which can cause your machine to stop or not sew right. Steve said to take a business card and slide it under the clip to remove any lint or dust. You can also clean it with alcohol (rubbing, not the drinking kind) and a Qtip.
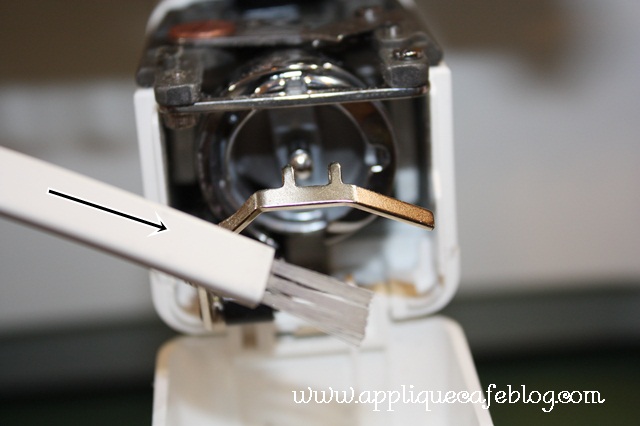
Your machine tool kit most likely came with this handy little brush. I use it in the bobbin case (and all over) to dust the machine. Again, it is AMAZING how much dust and lent can accumulate as you can see in my photos!
Your machine will also tell you to “please put a drop of oil on the hook once a day” when you turn it on each time. I turn the knob on the back of the machine until I can see V in the the hook, then put a drop of oil with my oil pen. I then turn the knob back and forth so that the oil disperses on the hook. I also clean the bobbin area with my brush, a Qtip and alcohol also, to get rid of any oil+lint buildup. You can see a video on how to do this properly HERE at sewingmachine.com!
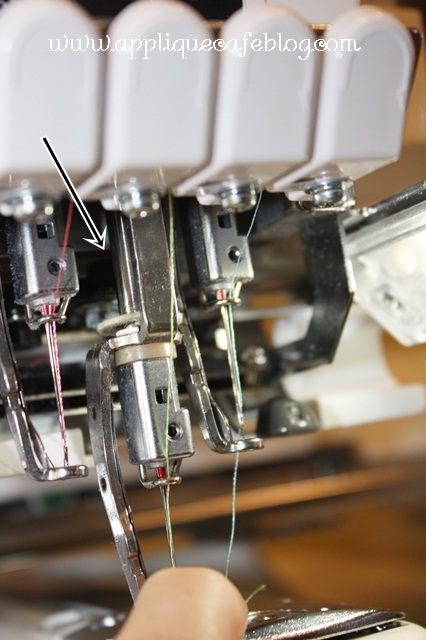
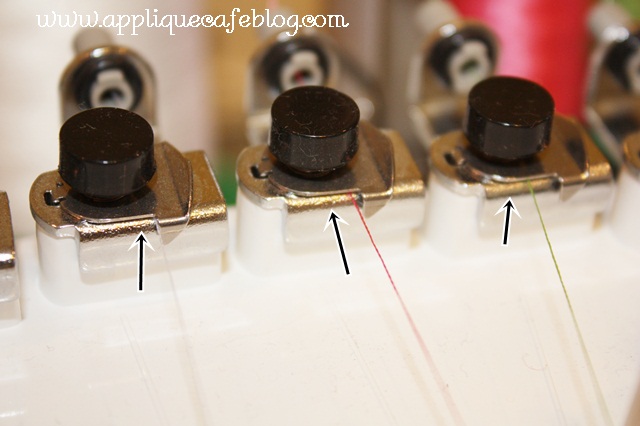
You have probably all gotten the error message “check upper and bobbin” or something to that effect. Your machine stops and you get that message and wonder what is wrong! If your bobbin is full, then it’s probably lint under the clips OR the silver tension disk is “stuck” and not turning properly (see below). I also did a post on NEEDLE 4 you can read which is notorious for that error message! If you get the message, check your clips and try to remove any lint or dust. You can use a business card corner, move the thread back & forth or use the little brush above to clean it out. Just don’t force the clip b/c it’s part of the tension system and you don’t want to break it.
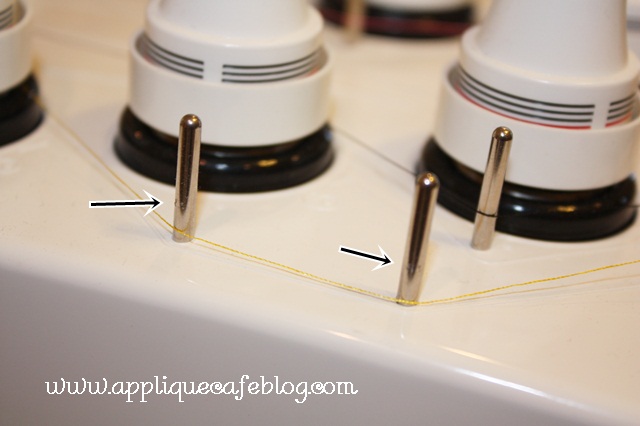
Your thread guides can also get wax buildup from your embroidery thread. Not sure if you can see the tiny “gunk” on the guides. You can clean it off with, again, a Qtip and rubbing alcohol.
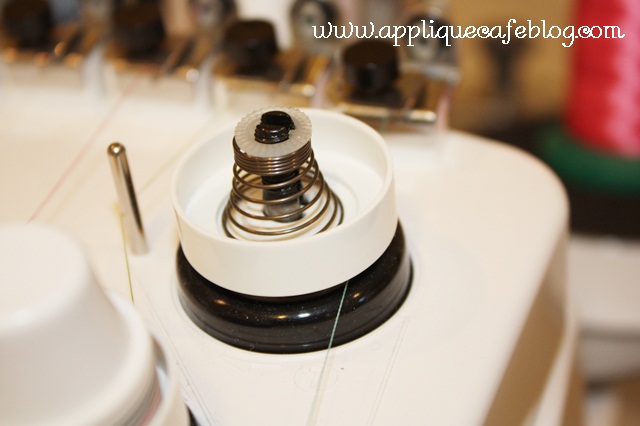
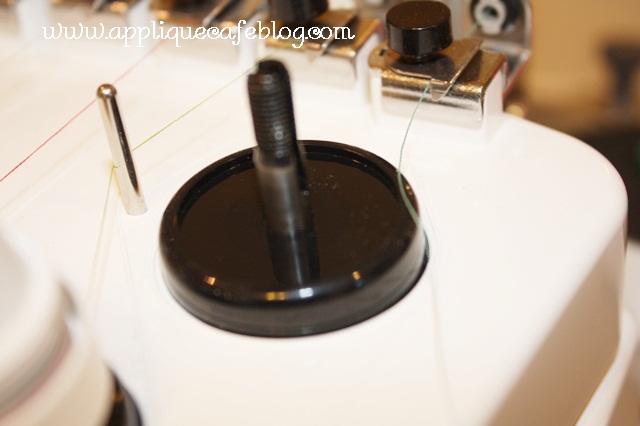
Sometimes when I get the “check your upper and bobbin” error message, I start my machine again and look to see if my silver tension disks are turning properly (the thread wraps around the silver tension disk). If they are jerky or not turning consistently, your machine WILL stop and give you the error message. You can easily take the tension knob off and clean everything. Just pay attention to what order everything is in. Here I unscrewed the top knob.
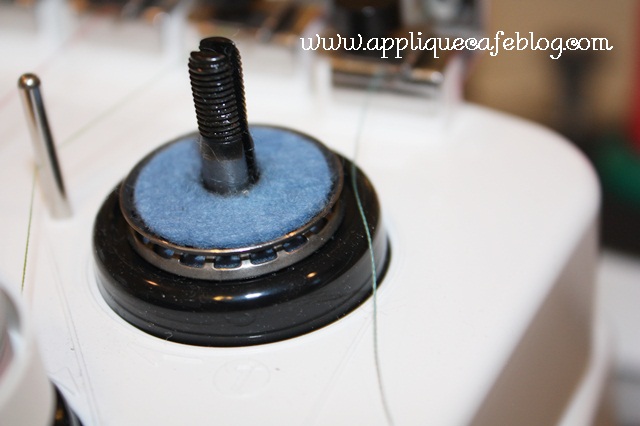
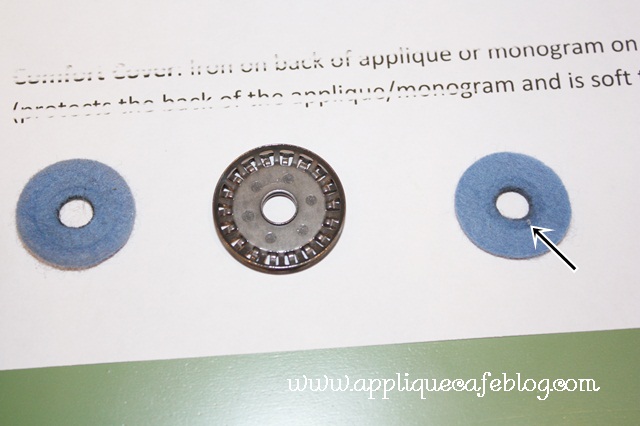
If you take the plastic white piece off along with the spring and the little plastic thing on top, you’ll see this felt pad, the silver tension disk and another felt pad underneath. Please excuse my non-technical terms!!
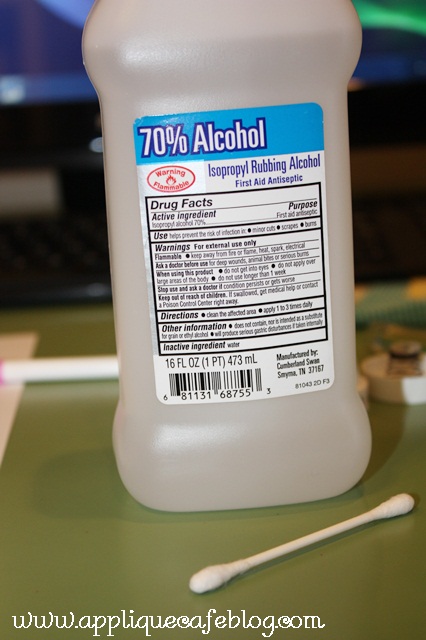
The felt pads can get dusty and pretty gross with lint (see arrow on photo below –> lint). I just use my fingers/fingernails to clean it all off. The silver tension disk can also get dusty and waxy in the grooves from the thread. AGAIN…. good ole Qtip and alcohol. I just go over everything with the alcohol Qtip on both sides of the disk. (these are my stabilizer notes for my weekend class!)
More lint to clean off.
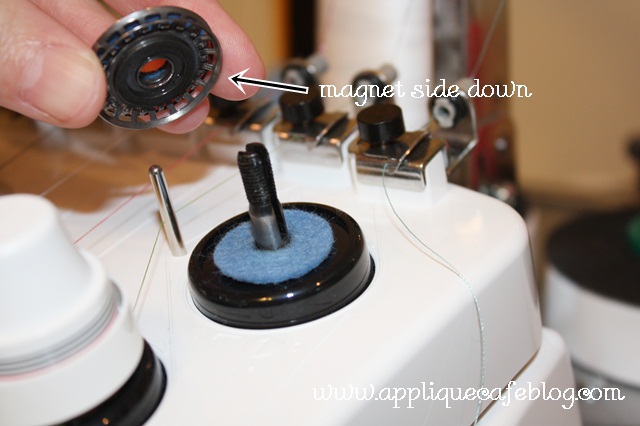
Once everything is clean, it’s time to put it all back together. Put the blue felt pad down, then your silver tension disk, MAGNET side down, then the other felt pad on top. You then put the white plastic piece/spring/plastic little piece on top back on and screw the white knob back on. You then wrap the thread around it as it is supposed to go.
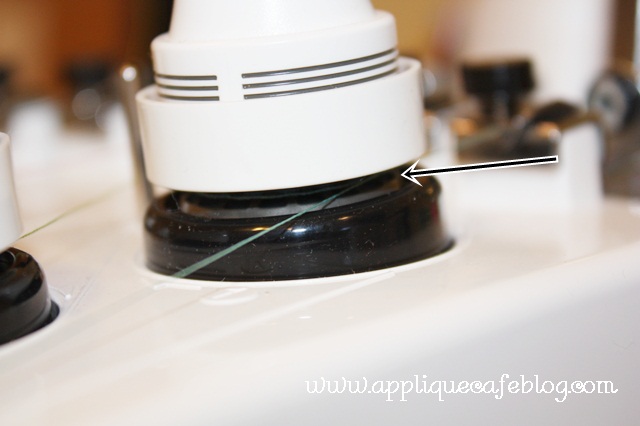
There is a red line on the tension knob that tells you approximately how far down the knob should be screwed on. Here is a better shot of the silver tension disk. If your machine is running and the disk is not turning properly, the machine will cut off and give you the error message! Gosh my photos show a lot of DUST!!
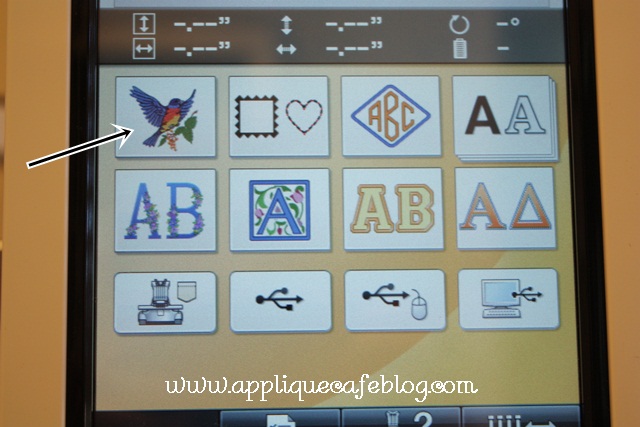
So you’ve put everything back together and your tension isn’t quite right. Luckily these machines come with a built in tension test! That is one great thing about multi needle machines. A lot of issues you might have you can solve yourself! If you have tension issues on a single needle, that usually results in a trip to the shop! If you keep your multi needle maintained and clean, a trip to the shop is only required for standard maintenance (every so many hours you should have your machine serviced). On your main screen, hit the button with the blue bird on it where your built in designs are stored!
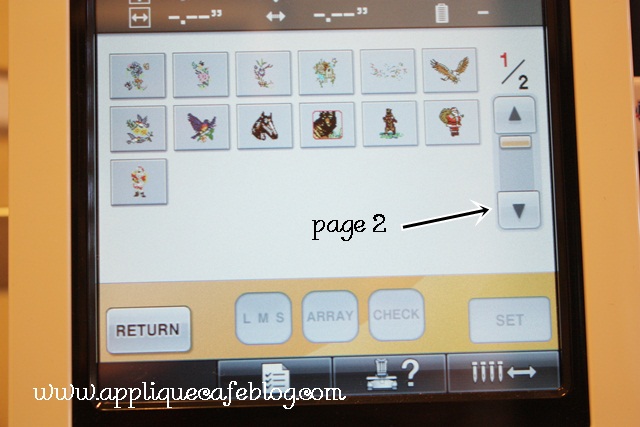
Then go to Page 2 for your tension test.
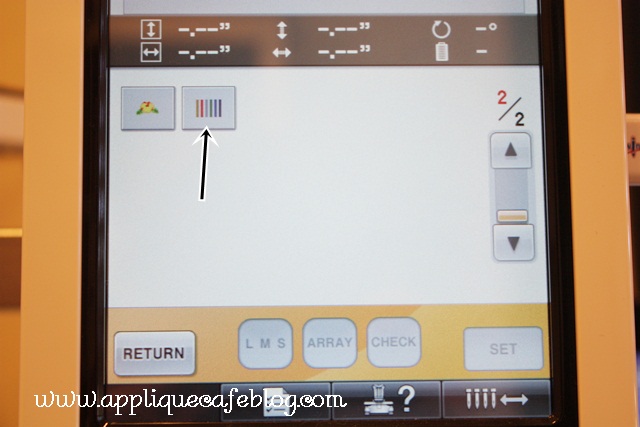
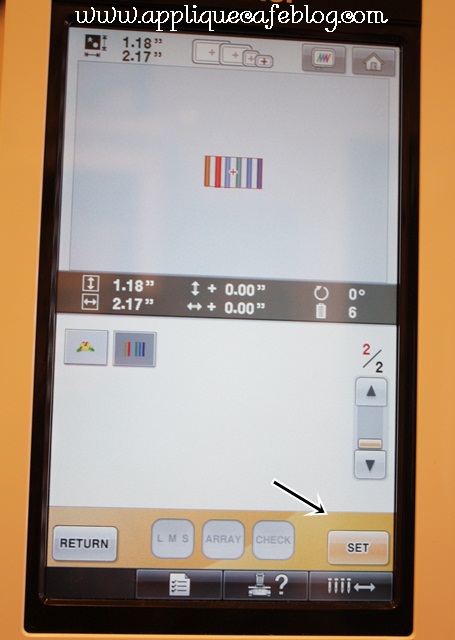
Click the button with 6 rows of thread.
Press SET to get the tension test ready! I assign the colors on my machine to the tension test so that each needle is tested. I hoop a piece of stabilizer or two and do my test on it. If any adjustments need to be made, you do it yourself by adjusting the tension knobs (tighter or looser) and you can then do the tension test again. When you look on the back of your tension test, a good rule of thumb is 1/3, 1/3, 1/3 ~ you should see left 1/3 your colored thread, middle 1/3 white bobbin thread, and right 1/3 your colored thread. If you see too much bobbin thread, loosen your tension on that needle. If you see very little bobbin thread, tighten your tension on that needle. Steve describes this as a tug of war between bobbin and upper thread! He explains better how to do this in his video ~ HOW TO ADJUST YOUR TENSION ON THE PR/EMP SERIES 6 NEEDLE.
I hope that helps!! p.s. I use Fil-Tec Magnetic Core Bobbins (MagnaGlide-L-). I just ordered a new box today! 100 come in a box which lasts a looonnnnggg time.
Let me say it again, I am not a PR650 expert!! Your dealer may have taught you different or you may have other tricks and tips to share! However, I have found these tips to be helpful in maintaining my machine and solving those pesky little problems!



Thanks…this was a big help…
Thank you! Thank you! Thank you!!!! I’ve recently purchased a used 6 needle and am still trying to work out all the kinks. I think this will help a lot!
Thanks so much, Rosemary….you’re a wealth of information!
Thank You so much for posting such wonderful information and your willingness to share the information. I have an Babylock 6 needle machine and it is the cousin to the Brother. They even have the same sounds!! All the information you share also applies to the Babylock. Again, THANK YOU! You really are a teacher 🙂
Mary
Thank You so much for this information. I have a 6 needle Babylock, do you think it would be safe to clean my machine the same as you showed? The Brother and Babylock are so much alike. Thank You again for all your help and great information.
Yes I believe they are essentially the same machine!
Thanks for your reply to my last question, but i have another question. I’m cleaning my machine, (by the way, it is bad) didn’t think I used it that much but just taking the plate off where the bobbin is, it’s was ugly. Ok back to my question, where you are talking about taking the cap off, I guess the tension cap, how do you get it off? I haven’t tried to hard, but I did pull up a little, and then I tried to turn like you would to loosen a bolt or screw, but it didn’t seam to be coming off. Wanted to ask before I tried again. Any information you could share would be greatly appreciated. Thank you again for all your tips and answers.
Tammy Lynn
Thank you so much for posting this information. I purchased my machine from Steve but had to leave immediately to go to my grandson’s first birthday party and then back home……………..so no instructions. I have been looking at videos and “winging” it. Your blog post really helps. Thanks again.
Dawn
Thanks so much for sharing this info! I’ve been cleaning & oiling our 650E but not this extensively. Your pictures and explanation really help. We purchased our machine from a dealer about 3-4 hours away and while they provide lots of phone support when we need it, we didn’t take time to go in-depth while we were at the dealer. Great job!
Best post ever!!! Learned a lot about my ‘big boy’! Off to go oil and clean!! Thanks for sharing all that great info! You rock!
Great post. Thanks for the detail in the photos.
Rosemary, I am really needing a new embroidery machine . I really didn’t want to spend quite as much as the 650 but have thought about it. How is sewingmachine.com about giving good deals on the machine? Also when you decided on it what was the criteria that sold you on it? I have looked at the dreamweaver XE brother and then thought of the embroidery machine only. What advice have you on that. Your advice on how to do this is very imformative. Are you going to be at the conference again? Looking forward to seeing you. Really excited . It was so great last year. Thanks again. Debbie
Yes I will be at EAC again! I am not familiar w/ Dreamweaver XE?? I started with a used PR600, so you might consider that route? I put it off forever, saying I did not want a 6 needle until I had my own sewing room. I kept having problems with my small machine I think so we bit the bullet and have not looked back! I saw immediately what all the fuss was about! Makes embroidery so much easier and expands your capability of what you can do!
VERY helpful information. Thank you for posting this. I’ve been having a problem with my needle 2 for weeks and I’ve just not been using it. It’s been a total pain. I fixed it today thanks to this post! You’re the BEST!!! Thank you a MILLION!!!
Charlene
Great post, Rosemary! You probably already do this, but keeping a can of compressed air handy is also very helpful. I use it about once a day and it is a quick maintenance fix!
I’m a little leery of those?? I’ve heard some people say it can push dust IN to the machine?? I can see where it would help though, especially on top where all the knobs are!
I just have to say…even though I have LOVED Monogram Wizard…you have given me the BEST advice on tips and tricks! I can’t tell you how often I use >>> or <<< now! Thanks for more tips!
Thanks for the info. cause the place that I got mine didn’t do this for me at all.I had to come home and just read the book it came with!
May I ask what kind of hoop is your 8×11? ( it look like a hoop-less )I never seen one like that,and boy do I need one like that! Please let me know and thanks again!
Thanks so much for this post. Love your blog! How often do you recommend getting your machine serviced? I have about 4.5 million stitches on it (bought in August 2012). How many hours/stitches should pass before I get it serviced? Thanks!
I would ask your dealer or service center. There is a rule of thumb – so many hours on the machine (sewing time). I am not sure what it is off the top of my head?
Generally five million stitches is a break in service. Robinson Sew & Vac
Rosemary,
The information provided here is absolutely PRICELESS! Thank you once again for relaying information that is much needed. Most of all, thank you for the photos and for writing this post, as I know you devoted A LOT of time to this.
I love all the new applique designs too!
Have a great week!
Hi Rosemary 🙂
Quick question, what is your opinion on Apples n Oranges romper quality? I’m in need of some nice quality rompers, but am hesitant to order, as I’ve never bought from them. I remember you posted a while back referencing using a romper for a shower gift. Thoughts???
On another note, I really look forward to trying the blanks you show in this post. We forever need new sources 🙂
Thanks much! You can email me if you like.
Andrea
I have used the Apples & Oranges rompers quite a bit and they are nice! Good quality and thick cotton and the trim is nice and different too (like white trim).
Last month I asked about my bobbin thread coming to the top of my embroidery but diod not get an answer. We have ckecked all the tensions and hey are correct. I have been told this could happen if we are using the wrong stablizer. Is this true and if so what stablize should I use to stop this? Please send the answer to my e-mail address listed above.
Thanks for your help.
Great Info….best EVER!!! Thanks so much for your instructions….very easy to follow! Job WELL DONE!! Thanks again!
HELP!! My tension disc on my second needle will not turn no matter what I do. I’ve tried everything you said and still no luck. As long as the tension knob is on it wont spin and with it off it’s not picking up the bobbin thread!
Is everything put back in order or the right way?
This along with your other blogs were very helpful.
Thanks for the tips and the pics. They were very helpful!!
Thanks for the great tutorial! This is something I really need to do! My machine keeps giving me the “upper thread bobbin” error and I couldn’t figure out what was wrong so hopefully this will help. I’m still really nervous to pull those tension knobs off and getting them back on right but with your awesome step by step pics, I’m going to give it a try:-)
I have 2 Brother 650e and a PR1000e. My problem is one of my 650e is leaving long thread. I put it on standard tail and still the same problem. Any solutions? Thanks
How long?? I assume you mean underneath??
On top. I cleaned and oil good yesterday. It works great now. Thanks for your fast response. Another problem I’m having is I get a wiper error. The thread does not trim at times and almost puts a hole in the material. Thanks
On a Brother 650e the thread will not thread automatic. Is there anything I can do besides taking it in to a dealer? I get better service by reading your post than the dealership. Thanks
Did you make sure all of the needles are installed correctly?
Yes, all needles are install correctly. Machine is oiled and clean. Thanks
And its all 6 needles
All 6 needles will not thread. Yes they are installed correctly. Thanks
I have the very same machine you are showing in this blog. I am having trouble with my bobbin stitching showing up on top. I am about ready to pull my hair out. Can you help. This has just started
Hey Debra, I think you emailed me about this and I replied??
Thank you so much for this really useful post. I really appreciate that your tutorial goes way beyond the instruction book. As everyone knows the 650e is not really easy to move and bring back to the dealer, so home maintenance is really important. When I followed your very clear instructions, I also realised how important a good dust cover is.
Hi!
Your information is very useful, thank you!
I am currently having some issue with my bobbin.. It’s threading down into the actual bobbin mechanism. not the bobbin case.. and if getting tangled and will not sew.
I have a babylock 6 needle.. any suggestions?
Thanks so much!
Have you cleaned everything out and maybe changed your needles? Make sure they are all screwed in correctly and tightly?
when I try to pull thread it gets tight thread take up lever. What could be the problem? IT seems to tight and thread is breaking.
Not sure what you mean by thread take up lever??
I have a PR 650 that I purchased recently from Ken’s and I was curious as to whether you had found any options for bobbins besides the prewound ones. Is there a way to winding them yourself? I’m coming from a single needle Bernina and have a whole lot of bobbin thread!
I think prewound is the best option! I like the magnetic ones. Your bobbin thread will be consistent and it’s wound the correct way!
Hi! First, I wanted to Thank you for all these helpful information. I just bought an used BabyLock 6 needles, it only has 16 hours and 388,899 stitches. I don’t want to doubt about the seller, but my husband (who paid for the machine) was asking me if it was possible that the seller delete the hours of use because is to low for 4 years. Do you think they can do that? I hope no please. I’m totally a newbie in the six needles world. Thanks!
I am not sure how you would do that? Maybe she just didn’t use it??
It is standard procedure for the Dealer to reset the stitch count and hours timers back to zero upon completion of the periodic service. This is so the user can ‘count down’ to the next service – usually at 500 hours. The total stitch count and total hours for the machine are kept ‘behind the scenes’ but can be accessed for reference.
Rosemary,
I wondered if you had encountered this…..last night my machine was nesting. I cleaned it under the plate & around the bobbin case etc. My husband was trying to help & took the screws from the cutter & blade. And now we get a trimming sensor error. we got it fixed from that & now it’s not cutting. I plan to call my service guy today…just wondered if you had this come up?
I have not had that issue before! I hope you get it fixed!!
Can you sign up to get emails from your blog? Very informative
You can sign up here to get emails http://feeds.feedburner.com/AppliqueCafeBlog
Any ideas on what causes loss of registration of a design while it is being stitched out. Design will start to stitch and then somewhere it will move over 1/4 to 1//2 inch and finish the design totally messing up.
Does it do it on all designs or just 1? Sometimes design files can become corrupt. They are digital, and are uploaded, downloaded, emailed, transferred, etc. so sometimes they can get messed up or become corrupt. If it’s happening on multiple designs, then it may be a machine issue.
I am doing a design on a polyester golf pullover. It is like a wind shirt pullover with a mesh lining. I am using a Heavy Duty Cutaway. I did one logo with no problem but the second and third were a disaster. I broke at lease 12 needles. A design that take 35 minutes, 18 thousand stitches took over 4 hours. I will clean the machine tomorrow but any suggestions what I am doing wrong? Using wrong? My thread kept popping, would not catch the bobbin thread or just broke the needle. HELP!
This post just saved me so much!!! Thank you. My bobbin thread was coming through the top of my design and I cleaned my machine and could not figure out what was going on. I was getting so frustrated as I have 8 items to do on my machine today. So after finding your post I cleaned my bobbin case with the business card and there was a small piece of towel stuck in there. Would not have found it if not for you. This post is awesome.
I have a babylock 6 needle machine also. I was doing a design and it cut the thread and when it went back to sewing it gives me the trimming sensor error. Please help.
Hi thank you for blog I have ordered magnetic bobbins and oil pen I have always cleaned my machine, I am finding embroidering words some are coming unraveled no sure why ? any ideas patterns seem to be ok very frustrating thanks again joyce
Hi there, first thank you for so much help. Second, do you think you can offer some advice? I think my problem is coming from the front plastic over area (where you thread up and down into the eye at the top, before taking the thread down to the needle-can you tell I am new to this? I don’t know the proper name of anything!) Anyhow, I think there is something in there that is making my thread tension too strong. I am breaking tons of upper thread. My tension knobs can be set at anything and this happens-tight, completely so loose that the knob is barely resting, etc. When I pull the thread though it is tough and tight, when I take it out of that front cover and just pull through while threaded in the upper tension knobs it feels fine. Do you know what could be causing that? Extra info: everything is cleaned, oiled including felt pads, no burs, newer needle and in correctly, needle is not hitting the plate, etc. We have ruled out the “typicals” and are stumped. Thanks!
Hi Rosemary,
I know this is an old post but it struck me when I saw you said a good dust cover!
I just recently got a PR600ii and she is like NEW! excellent machine and I want a good dust cover for her but I can’t find one anywhere? do you know where to find dust covers for these 6 needle machines?
Thank you so much
Lynn
I would google it or try Amazon? I don’t have a cover for mine, but I’m sure there are covers out there! Or any Brother dealer might sell them. It may be something you have to call about! I know my sewing machine came with one, and I can’t remember if my single needle did too?
Thankyou so much that was wonderful – so well written and easy to understand.
I have a PR650 Brother and it has started making a kind of squeaking noise – it seems to be coming from the somewhere around where the needles go up and down. Its still working fine but and this noise is only new. I do use it a lot.
What do you think ?
I will go through your cleaning steps tomorrow very carefully and see if that makes a difference.
Do you do any other classes about the PR650 ? Its a wonderful machine but I am aware of the fact that I hardly use it to it’s full potential.
I would appreciate your feedback.
Thanks,
Angela
Have you oiled the needle shafts lately??
So glad I found this thread!! Helped a lot!! Thank you!!!
Thanks SO much for the tips on the “check bobbin” error. All of a sudden my machine started doing that. I had to keep restarting it to get the design finished, so annoying. I will do all you suggested and let you know if it doesn’t work. Thanks again!
The information you have provided on 6 needle embroidery machine is what i really needed. bought BabyLock enterprise 11 not having any instructions/class on this machine it’s been an experience. Thank you so much. It took me a year before i would use it. Scared me. my major problem is setting up theh color changes. Your instructions made a difference. Cleaning was another issue, all set now because of you. Dust cover, i use a shower curtain. taking it off can mess up the threads a bit bit it works.
from ginnie
I just happened upon your blog on accident, and I am SO GLAD. I scored a PR655 for a steal, and this error is the bane of my existence. Sure enough, it’s always needle 4! I had already thoroughly cleaned the machine, so I tried wrapping the thread twice. It’s sewing like a dream now. THANK YOU! You saved me a lot of time!
I just got my machine back from a very good cleaning at All Brand. It went there because I was getting the trimming senor error. I’m still getting that error. What else could have caused that
What does the error say exactly?
Trimming sensor error
Did they service it or just clean it?? I just googled “Brother PR650 trimming sensing error” and several things popped up – did you try that? I use Sewingmachine.com and I see they have some info on that error also. There are also several posts that pop up from the Brother website. I would look in to those and see if it’s an easy fix.
Thanks I will definitely check the sites. I was told I was getting that error because it needed to be clean
Im gettting a lot of white bobbin thread coming through on each side of the test lines im doing. Ive loosened the top tension and ive cleaned all the tensions. Its still doing it. Im stumped as what to do now? Can you help me ?
Thank you
Anita McClain
Have you cleaned your bobbin area and the “clip” of the bobbin – you can get under it w/ a business card and it will remove any lint that might be there. ANd double check that everything is threaded correctly and under all the clips and around all the guides!
Cleaning that clip COMPLETELY fixed this problem for me! THANK YOU!!!
I have a baby lock 6 needle model BMP9 …..I have trimming error . I have cleaned under the plate bobbin . Is there a way to reset the trimmer seem to be not working after cleaning.. how can i know if the trimmer is even moving correctly. Any hep would be greatly appreciated…….
Hi,
Does anyone know how to find the hours run on a BMP6 Babylock Embroidery machine?
Looking to sale and can’t find it for the customer.
Thanks
Dawn Hopkins
Albemarle, NC
Have you scrolled through the menu? On mine it’s like on the last page.
Hi I have brother pr650 and one of the needles keeps stopping, i have taken of tension knob and cleaned, changed the needle, tried different threads? is there anything else i can try??
its driving me mad
thanks in advance Rob
Which needle is it?
Thank you so much that was wonderful. Apparelinclick Thanks for the sharing with us. how can I take this?
Using compressed air balled up tons of thread dust back into the arm on my Pr620. i will never do that again.
We were having so much trouble with our machine stopping and stopping and followed your suggestions and it worked !!!’ Thank you so so much. We cleaned the tension areas and we are in business again.