I posted on Facebook a week or two ago asking for blog topic suggestions. Someone mentioned my PR-650 (or 6 needle “professional”) machine ~ an intro of sorts for any of you saving your pennies! I personally started with a Brother PE700 single needle machine, taught myself, and used it (and a 2nd machine ~ PE770D) for a good 3 years. I always said “I don’t want a big machine“. I certainly didn’t want one until I had my ‘dream’ sewing room. At the time I was in my dining room right in the middle of our foyer and den. Long story short I broke down and got a used PR600, and then soon after upgraded to a new PR-650 (August 2010). Yes, it was in the middle of our dining room until we moved in to our new house this past July where I now have the sewing room that I’m forever trying to decorate…. I haven’t looked back and have loved every minute of using it! Now they have the PR1000 coveted 10 needle, but honestly I’ve never needed over 6 needles on a single applique. Not that a brand new 10 needle wouldn’t be nice, but I’m perfectly content with my PR650.
This is a very brief overview, as I only took pictures today while monogramming a simple hand towel for Sissy’s bathroom. I will try to work on an APPLIQUE post using the 6 needle soon. I recommend seeing a dealer or your local sewing/embroidery store ~ I got a demo and a short lesson before I bought mine. And, I’m posting about the Brother machine because that’s what I have! I’ve owned 4 Brother machines so that is all I know. Babylock is similar (BMP) and I’m sure there are other brands/machines out there!
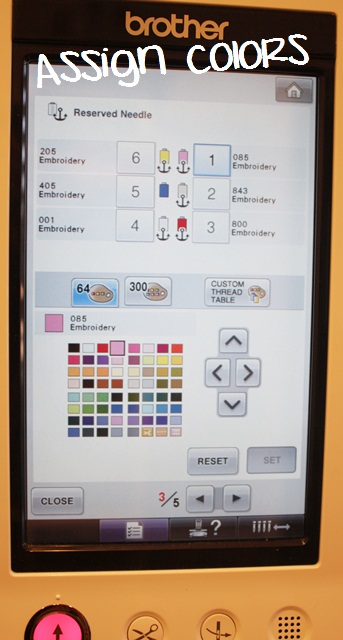
First of all, you obviously have 6 needles on this machine = 6 spools of thread capability, so when you put your spools of thread on your machine, you need to assign the colors of each thread to the respective needles. The anchor (see below) means that color is “set” on the needle. The machine will not allow you to anchor all needles ~ one is always left “free” and will be your default needle if you happen to program in the wrong color, or if you don’t program in your colors at all. It will default to that needle. I usually keep white and black on my machine and one of those is that non-anchored default needle. A little confusing I know! I just chose the closest color from the 64 choices (color chart) below. You just have to remember which color you programmed, because when you load your design you’ll have to assign the right colors. I don’t know that all people assign colors each time they change out their thread, but I do (for each and every design). This tells my machine that light pink is on needle 1, taupe is on needle 2, red is on needle 3, etc. This might make a little more sense down below. (p.s. later you’ll see black thread is actually on my needle 5, but since that needle is not anchored it doesn’t really matter that it says blue.)
p.s. These screens are all touch screens, so you simply press the buttons on the screen and press the colors you want (the squares are really tiny too so it can be tricky). My used PR500 was NOT totally touch screen so you had to use the arrows to move around to the different colors, then SET.
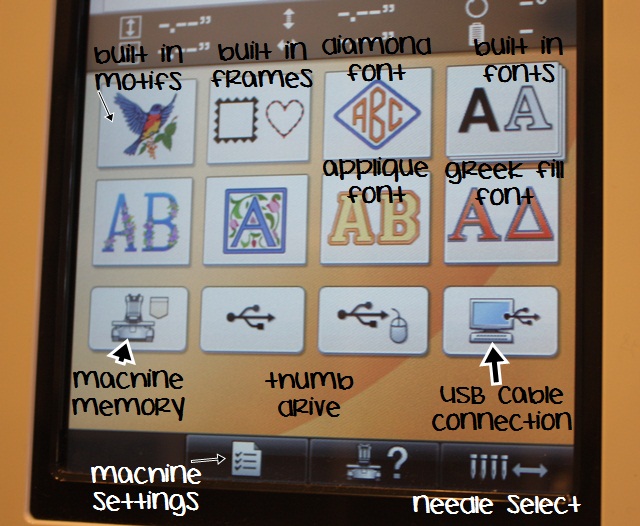
Here is the HOME MENU below. I don’t use the machine fonts or motifs that often (the diamond font on occasion), so I basically use the lower right button which brings up any designs I’ve saved to my machine via my USB cable cord, which connects my computer to my machine. When I have a design on my computer (in Sew What Pro or Monogram Wizard Plus) I save to the E: drive which is my machine. It puts it “inside” that folder (the lower right folder). I only save designs ON my machine (machine memory button) if I’ve loaded a design but want to wait until the next day to sew it. In that case I might save it to my machine memory and would then press that lower left button to retrieve it. You can also use a thumb drive but I use the USB cable cord connection.
Bottom of the picture – you can see the button you press for all machine settings – looks like a check sheet (this is where I assign colors to my needles). Other settings (and there are 5 “pages” of settings): chose background color of your screen (mine is white), screen saver time, lights – off/on, etc. (like I said, 5 pages of settings) This is also where you can see what your machine time is ~ hours of sewing time on your machine, total stitch count, etc. 99% of the time I ONLY click this button, go to page 3, assign my colors to my needles and that is IT.
Bottom right – needle selector. Press this and it will show you needles 1-6. You can move back & forth to whichever needle you need to (to thread each needle, etc). This is used when threading needles when you change thread colors.
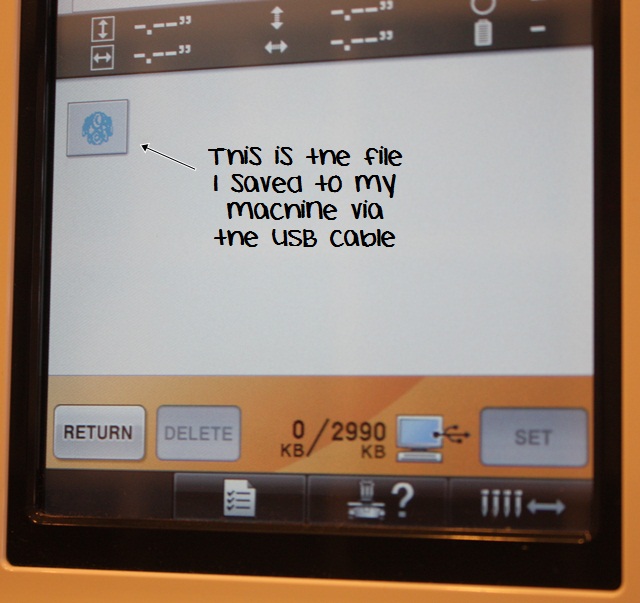
So I’ve pushed the button to retrieve my file saved to the machine via my USB cord, and I’ll select the monogram file (Mallory’s initials) and press SET.
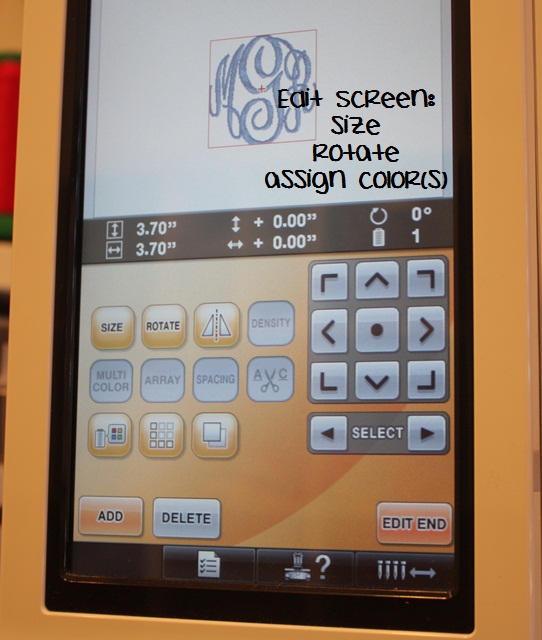
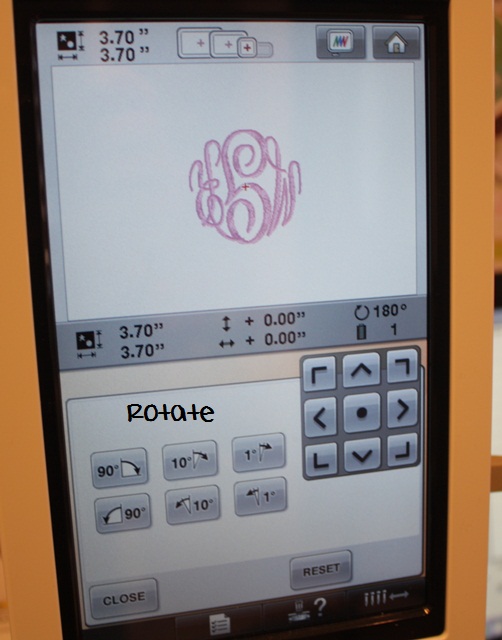
The file (monogram) is ready to edit. I can adjust the SIZE (most machines will adjust 10-20% smaller or larger), ROTATE (90 degrees, 10 degrees, etc), MIRROR IMAGE (flip flop the design) and most importantly – COLOR! You also may notice ADD, DELETE ~ you can add in a design, etc. Since I do all of my “work” on my computer (Monogram Wizard Plus or Sew What Pro), I do not use this feature. The arrows on the right are used to move the design around, and I guess you’d use this if you merged in something else. I don’t use the arrows at this point.
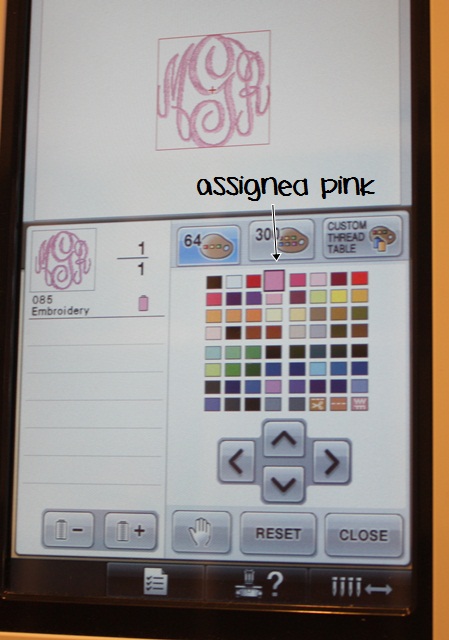
I’ve selected the COLOR button (looks like a spool of thread w/ the 4 color squares). Since this is a monogram it’s 1 color/1 step. If it were an applique, there would be a list of steps and colors to assign. I select pink – the SAME pink I assigned to my needle #1. Remember, if you select a different shade of pink, the machine will default to that unanchored needle, which is probably black or white on my machine. The good news is, your machine will warn you before you start that a color is assigned that is not assigned to a needle IF YOU PAY ATTENTION!! I have left the room and sewn the wrong color before! Again, if I were doing an applique, I would assign step 1, then press the “+” to go to the next step and assign the next color and so on and so forth. When you’re done press CLOSE.
** You might also notice the HAND button. This is used when doing applique ~ if you want your machine to stop before a step, then you press the HAND! I would program stops in between the steps so I’m able to lay my fabric down, trim my fabric, etc. If you don’t program any steps, the machine will NOT stop!
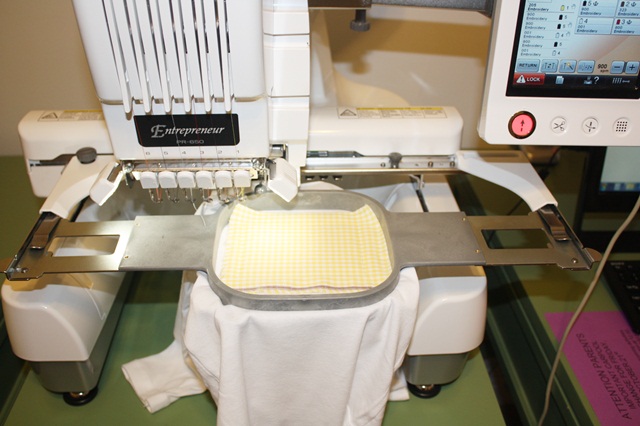
I hooped my towel and wanted to monogram upside down so the towel excess hangs to the front of the machine, so I rotated the design 90 degrees. (When the hooped towel is placed on my machine, it’s upside down, so I want to monogram it upside down.)
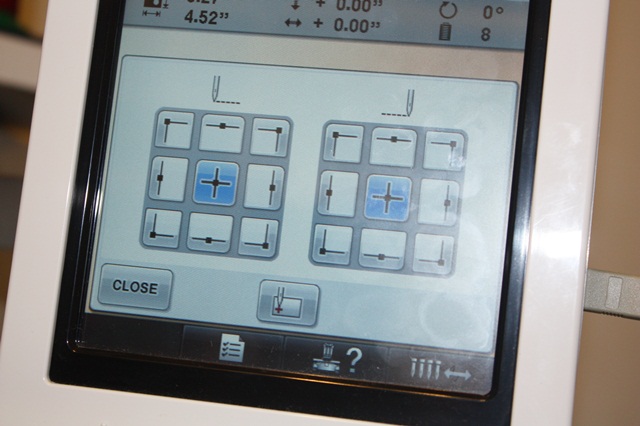
When you are ready to sew you’ll see this screen. After all the editing you’ll press EDIT END. You can then move the needle around to line up with the center of your garment. You will also see below your needle is assigned to pink, needle 1. If this were an applique you would see a list of colors and steps! You can also see to the right my computer screen with the monogram on it in Monogram Wizard Plus. P.S. This is Master Circle MWP alpha pak 14 font – LOVE it!
I’m ready to sew, so I would then press the LOCK button to unlock the needles, then START on my machine!
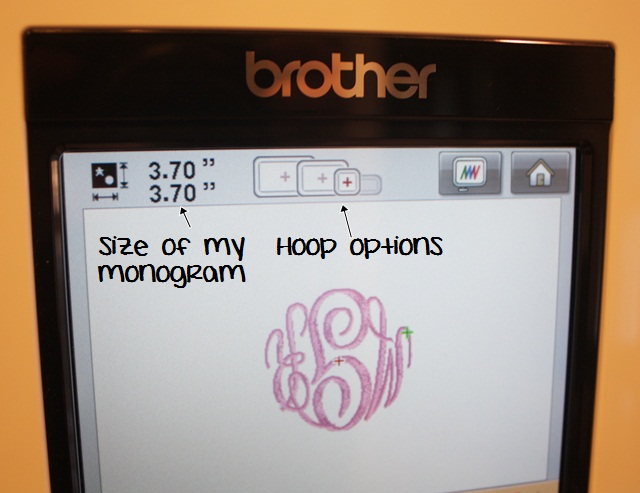
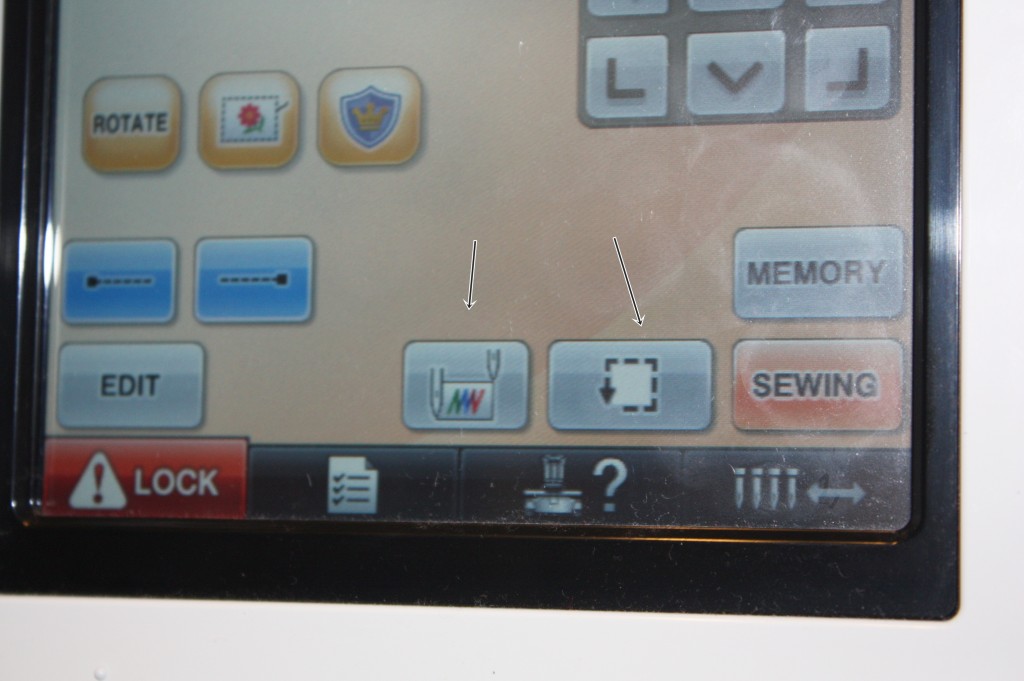
Top of screen ~ the size of this monogram is 3.70″ x 3.70″ and you can see it shows you which hoops you can use. I’m using the 4×4, but you could use any of the bigger hoops too. The hoop looking button shows you what your design looks like IN THE HOOP ~ there is actually an image of the hoop and your design in it on the screen. The HOUSE is the HOME button!
Here’s a shot of the thread ~ they are intricately run through all of the guides and tension knobs. When you change thread, an easy shortcut is to tear or cut the old thread off right at the spool, put the new spool on, tie the old & new thread (ends) together in a knot and then pull the thread through the guides/knobs and then rethread the needle. Pulling the old thread will pull the new thread through since they are tied together. Huge time saver! I’ll try to take a picture of that next time too.
Tension ~ there is an excellent video at www.sewingmachine.com on how to do a tension test, which is a feature of the machine. Once your tensions are right, there is no need to adjust them. I rarely ever fool with the tension knobs! The only maintenance I do on this part of the machine is the occasional cleaning and dusting ~ wax from the thread sometimes builds up on the guides (alcohol and a Qtip will clean them off – the guides are the silver sticks you see) and also dust can build up or get under the clips.
Any piece of lint can cause the machine to not work properly!! Your machine might stitch a few stitches and then STOP and tell you to check your upper thread and bobbin thread. It’s important to keep the machine clean and dusted.
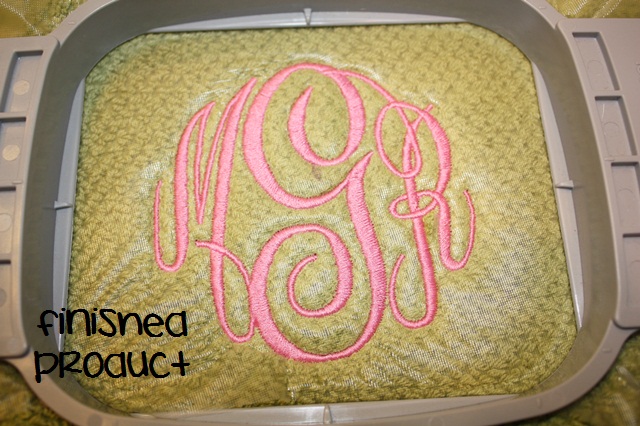
Now… I’ve sewn my towel and this is the finished product! I used iron on tearaway stabilizer on the back and solvy on top!
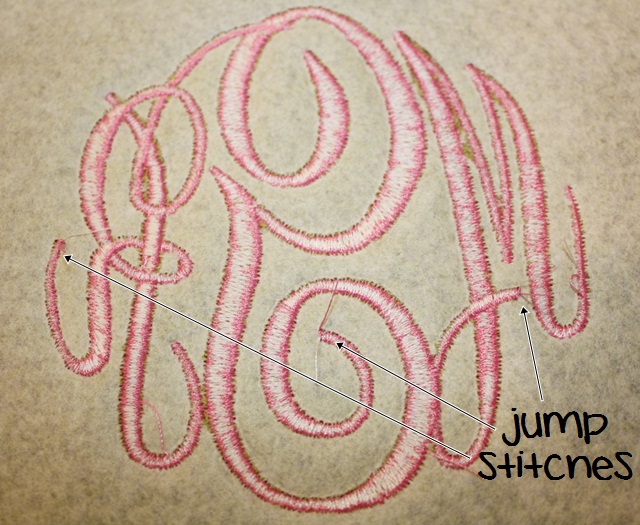
My FAVORITE thing about this machine is that it clips jump stitches UNDERNEATH the item! A major time saver!!
This was a very basic overview of the machine! I’ll try to do an applique post on the 6 needle soon! There are other features of the machine that I simply don’t use or I forgot to cover. It’s a little different doing an applique too (mainly programming in ALL of the thread colors and programming in the stops so the machine will stop). I will work on that post soon! If you have any other questions, please comment and I’ll address them next time!
This all may seem confusing or complicated, but I promise it is super easy and once you get the hang of it you will wiz through all of the steps in lightening speed! I can now set it up for an applique with my eyes closed!
My “PROS” of this machine:
- Of course, being able to use 6 needles and 6 thread colors at once! I remember changing thread on my single needle machine for every color of an applique. I could do it in my sleep, but having the option of 6 colors is great!
- Clipping the jump stitches underneath! Huge time saver ~ sometimes small embroidery jobs (small names, etc) jump from one letter to the next w/out clipping, but for the most part you can do a monogram or a name or applique and not have to clip a single jump stitch!
- Very low maintenance ~ other than keeping it dusted and clean, there is very little maintenance! If your tension is off, you simple adjust the knobs. If your tension is off on a single needle machine, it usually means a trip to the shop! On these machines you can usually make all adjustments yourself. It’s recommended you get your machine serviced every so many hours of sewing time.
Please email me with any questions or comments! BTW, this machine came from Sewingmachine.com! AND… if you know any short cuts that I am not aware of, please share! This is how I learned the machine so this is how I do things!





Recent Comments